How to Replace Damaged WPC Panel Effectively?
Replacing damaged WPC panels can seem daunting, yet it's a task many homeowners face. WPC, or wood-plastic composite, is a popular choice for decks and fences due to its durability. However, exposure to the elements can cause wear and tear. Knowing how to effectively Replace Damaged Wpc Panels is key to preserving the integrity of your outdoor spaces.
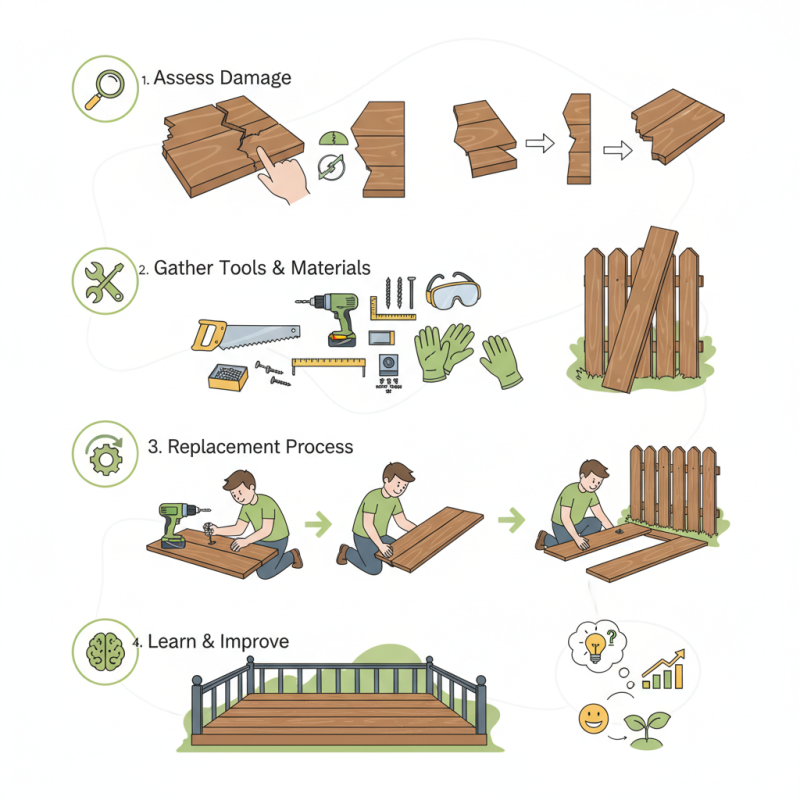
When you need to replace a damaged WPC panel, it's essential to assess the extent of the damage. Some panels may just need patching, while others require complete removal. Proper tools and materials are crucial for the job. Rushing through this process can lead to further issues, like misalignment or inadequate support.
Beyond the technical aspects, the experience gained from replacing damaged WPC panels can empower you. You become more familiar with your space and its needs. There’s satisfaction in observing a well-executed repair. Remember, though, that imperfections can occur. Mistakes may lead to reflections on improving your approach for future repairs. Consider each project a learning opportunity as you navigate the world of WPC panel replacement.
Understanding WPC Panels and Common Damage Types
WPC panels, made from wood and plastic composites, blend aesthetics and durability. These panels are often used in outdoor settings, such as decks and fences. However, they can suffer from various types of damage. Common issues include scratches, discoloration, and warping due to weather conditions. Identifying these problems early is crucial for efficient repairs.
Scratches may occur from heavy furniture or sharp objects. While small, they can accumulate and detract from the panel's overall appearance. Discoloration often happens from prolonged UV exposure, leading to uneven fading. Additionally, warping can result from moisture absorption. This is especially apparent in areas with poor drainage. Each of these damage types poses unique challenges, requiring tailored approaches for effective replacement.
Addressing the damage effectively demands careful planning. Consider the environmental factors and select the right replacement materials. Always seek expert advice if unsure about the process. It’s vital to reflect on the longevity of the panels and the maintenance required. Understanding the nature of each damage type allows for more sustainable repairs and better long-term outcomes.
Assessing the Extent of Damage to Your WPC Panel
Assessing the damage to your WPC panel is crucial for an effective replacement. Begin by closely examining the affected area. Look for cracks, warping, or discoloration. Use a moisture meter to check if water intrusion is a factor, as this often leads to greater damage over time. Even small issues can signal underlying problems.
Once you identify the visible damages, consider their extent. Is it superficial or structural? Minor surface scratches may only require sanding, while deeper damages might need panel replacement. Inspect adjoining areas for signs of deterioration. This could indicate a larger issue that may affect the integrity of your entire installation.
Take note of any previous repairs. These can offer insight into recurring problems. Document the damages with photographs for reference. It is essential to recognize that WPC panels can be surprisingly resilient but also prone to damage from environmental factors. Careful assessment will guide you in making informed decisions for your next steps.
Tools and Materials Needed for Replacement
When replacing a damaged WPC panel, the right tools and materials are essential. Start with a measuring tape to determine the size needed for the new panel. A saw is crucial for cutting the panel to fit perfectly. A power drill will help with installing the new panel efficiently. Don’t forget safety gear, like gloves and goggles, to protect yourself from splinters and dust.
In terms of materials, you’ll need a high-quality WPC panel that matches the existing ones. Check local suppliers for options. Wood screws are important for securing the panel in place. Adhesive can also be used alongside screws for extra stability. Sometimes, you may need additional sealing materials to prevent water damage. Having everything prepared in advance will help streamline the process.
While changing panels is manageable, uncovering hidden issues is common. You might find underlying water damage or pest problems. This situation demands careful inspection. It’s important to address these issues immediately to prevent future headaches. This experience highlights the need for thorough preparation and patience. Learning and adapting can make the process smoother.
Step-by-Step Process for Removing the Damaged Panel
Replacing a damaged WPC panel is a task that requires careful attention to detail. Start by gathering the necessary tools. You'll need a pry bar, a measuring tape, and a saw. Make sure to wear safety gear. Check the panel for signs of damage. If you notice cracks or warping, it’s time for removal.
Begin the removal process by gently prying up the existing panel. This requires patience; forcing it can lead to further damage. Carefully slide the pry bar under the panel, lifting it gradually. Take a moment to reflect on how the panel was installed. Were there any mistakes in the original process? Understanding this can aid in preventing future damage.
Once the panel is free, measure the area for the new panel. Getting accurate measurements can be tricky, especially in tight spaces. If you find this challenging, consider seeking advice from someone with more experience. After ensuring you have the correct size, cut the new panel accordingly. Remember, attention to detail is key for a smooth fit.
Installing the New WPC Panel: Tips for a Secure Fit
When installing a new WPC panel, ensuring a secure fit is crucial for longevity. Begin by measuring the area accurately. Precision prevents gaps, which can lead to water damage over time. Even a slight miss can compromise your installation. Use a level to ensure everything is straight. A crooked panel affects the overall appearance and stability.
Before placing the panel, prepare the surface thoroughly. Remove dirt and debris. Ensure the edges are smooth. A rough surface can cause the panel to warp or detach later. Don't rush this step; taking time here pays off in the long run.
When securing the panel, use appropriate fasteners. Make sure they penetrate deeply for a solid hold. Regularly check the placement as you work. If the panel doesn’t fit snugly, it’s time to reassess. Small adjustments can make a significant difference. Rushing through can lead to mistakes you might regret later. Always prioritize a careful and methodical approach for the best results.